

If you’ve been following my last two Plumber articles, “Totally Loaded” and “Adding Up,” you can certainly confirm that there is much more to being a plumber than “hots on the left and colds on the right” and, of course, “the rest runs downhill” part of the joke we tend to encounter from those outside of the plumbing trade who don’t understand the full extent of the training we must take to become licensed professionals.
If you’ve followed me over the last several years that I’ve written for Plumber, then you know how much I care about the plumbing trade and the importance of the work done by the men and women of it. I’m just returning from another assignment that I completed for my International Water, Sanitation, and Hygiene team (iwsh.org) where both safe water and sanitation was scarce. When you’ve witness firsthand as I have, raw sewage flowing in a homeowner’s backyard where their children play and an 80-year-old woman on oxygen who must have water hauled to her home and who must use an outhouse, you become so humbled and so incredibly thankful for everything a plumber does. I’ll share more on that trip in one of my next articles, but until then, keep being you and don’t forget the importance of our work!
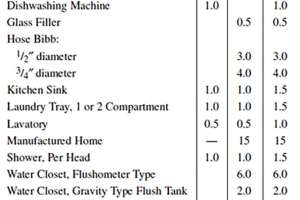
So, let’s do a quick recap of what we’ve accomplished over the last two articles. First, we agreed that you should always use your plumbing local code when doing any plumbing work and that not all codes are written the same. Next, for this article and to size the water distribution pipe, remember that we used this table (Table 1 - see right) to determine our water supply fixture units.
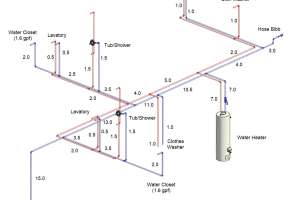
We then took the wsfu from Table 1 and applied to the water distribution piping as seen in Figure 1 at right.
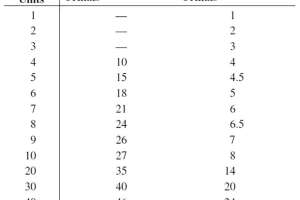
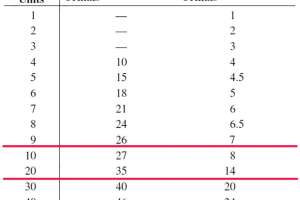
Our next step is to convert the total wsfu for this design, which is 15, to gallons per minute which will allow us to determine friction loss and eventually size the water piping. For this step we’ll use Table 2.
Notice that wsfu are listed on the far-left side of this table and the corresponding gpm are listed in the following two columns on the right. The total wsfu load for this building is 15. You’ll also notice that 15 wsfu is not on this table; however, 10 and 20 wsfu are.
Also note that the difference between the two gpm columns. The column on the right is for converting predominately flushometer-type fixture wsfu such as flushometer water closets and syphon jet urinals to gpm. The column on the far right is for converting predominately flush tank water closets or washdown type urinals to gpm. For the types of fixtures, we have in our design, we will convert the wsfu to gpm using the far-right column (predominately flush tank water closets or washdown type urinals).
To convert the wsfu to gpm for our design, we can simply do the following:
15 wsfu is exactly halfway between 10 and 20 which in turn means the gpm would be exactly halfway as well. (15 wsfu = 11 gpm.)
Now that we have the gpm for the building, we can determine the uniform pressure loss for this design and size the pipe.
Before we can go much further however, several variables need to be determined for each specific project. They are but not limited to the following:
- Difference in elevation between the water main and the first valve immediately before the meter. (Some codes may not require this valve and the elevation would then be measured between the main and the water meter.)
- Size of the water meter
- Length of the water service from the main to the meter
- Type of material used for the water service
- Pressure required at the controlling fixture. (Some codes may refer to this fixture as the most remote fixture.)
- Difference in elevation between the building control and/or the water meter and the controlling fixture (aka most demanding fixture)
- Length of piping from the building control and/or the water meter and the controlling fixture (aka most demanding fixture)
- Type of material used for the water distribution system piping
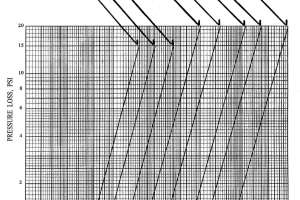
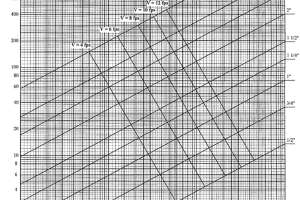
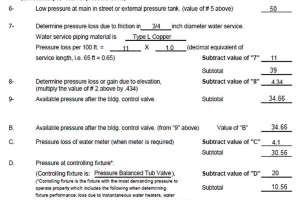
Also, to determine friction loss for the water meter and the water service, you should always refer to the manufacturer’s specifications whenever possible. For this example, I used the following graphs to determine the pressure loss based on our pre-determined 11 gpm through the water meter and a Type L copper water service.
To determine friction loss in head per 100 feet of pipe which will give us the minimum pipe sizes, I used the worksheet below.
As you can see from the worksheet, all the variables I previously mentioned were plugged into the final calculations to determine pipe size. The final answer on the worksheet is 18 psi per 100 feet of length (rounded up).
The last step to determine the final pipe size is to cross reference the 18 inch-pounds per 100 feet of length on the appropriate table or graph that represents the type of material used for the water distribution system. In this case, Type M Copper.
Also, keep in mind almost all codes require that maximum velocity of the water distribution system be 8 feet per second or less and some codes require that the hot water piping not exceed 5 fps. For this example, we will keep it simple and just size all piping to maintain less than or equal to 8 fps.
Using the following table, you can see the pipe sizes based on 18 inch-pounds per 100 feet of length.
Per the table our pipe sizes would be as follows:
- 1/2-inch Type M Copper could serve 6.5 wsfu before exceeding 8 fps.
- 3/4-inch Type M Copper could serve 18 wsfu before exceeding 8 fps.
I’ll also point out that you should always refer to your local plumbing code for the maximum wsfu allowed on any given pipe size. Some codes are very conservative and restrict the wsfu on 1/2-inch pipe especially when serving a shower which is not individually pressure balanced or individually thermostatically blended.
So, there you have it. Based on the information above any piece of piping that has 6.5 wsfu on it would be 1/2-inch and the remaining pipe would be 3/4-inch. Remember, always refer to your local code for sizing requirements.
Sized, Sealed and Delivered. By the way, the next time “that person” says “There’s nothing to plumbing, hots on the left, colds on the right, and it all runs downhill,” whip open my last three articles here in Plumber and walk them through water pipe sizing! Good Luck!
------------
Randy Lorge is a third-generation plumber and the director of workforce training and development for the International Association of Plumbing and Mechanical Officials. Lorge is also a member of the planning team for the International Water, Sanitation and Hygiene Foundation. This 501(c) (3) foundation has completed water and sanitation projects for those less fortunate in India, South Africa, Indonesia and, more recently, the United States. He enjoys time with his family and spending as much time as possible in his deer stand. To contact Lorge, email editor@plumbermag.com.
Continue reading for free