Even seasoned professionals sometimes make mistakes. Whether due to habit, outdated practices, or misconceptions that have been passed down over time, these small errors can quickly turn into costly or time-consuming problems.
Often, these mistakes are easy to overlook, but they can lead to bigger issues like leaks, system failures, or unhappy clients down the road. By addressing and avoiding certain mistakes, you can improve the quality and efficiency of your work and protect your reputation and credibility.
Here we’ll explore some of the most common plumbing mistakes our technical applications team at Oatey encounters and explain why small adjustments in technique or approach can significantly impact the success and longevity of your projects.
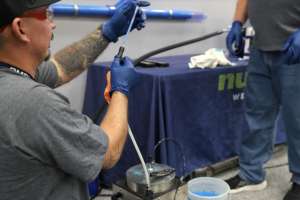
1. Common solvent welding mistakes
Improper pipe preparation:
- Cut the pipe square: Cutting the pipe square maximizes the surface area available for fusion, ensuring the joint is strong. A crooked cut reduces the bonding surface and compromises the joint.
- Deburr the pipe: Failure to deburr can lead to loose plastic shavings entering the system, potentially causing blockages or snags in aerators. Burrs can also catch debris, which may lead to drainage issues.
- Chamfer the pipe: Chamfering the outside edge of the pipe prevents sharp edges from scraping cement off during assembly, which can create weak spots or leak paths in the joint.
- Clean the pipe: Any dirt, grease, or debris can interfere with the cement’s ability to adhere to the pipe properly, weakening the bond and leading to leaks.
Test the fit: Before applying primer or cement, ensure the pipe fits snugly into the fitting hub with some resistance. A poor fit can lead to a weak joint or pipe separation later.
Avoid using the wrong cement: Using the correct cement for both the pipe size and material is crucial. For instance, applying a cement with the wrong viscosity on a larger 10-inch pipe can result in a weak bond, as the cement’s solids and resins are formulated for specific sizes. Additionally, selecting the right cement for cold conditions is essential. In wet environments, using cement formulated to cure in those conditions ensures a strong, reliable weld.
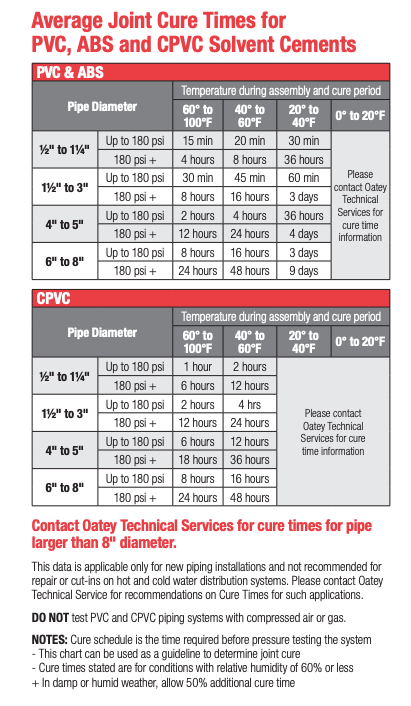
Wait for the appropriate set and cure times: Once the joint is assembled, leaving it untouched for the recommended set time is essential. This allows the bond to gain enough strength to prevent any compromise from minor movements.
The curing time varies depending on the pipe material, size, temperature, and humidity. View our overview document for cement offerings and their cure/set times.
Apply cement or primer evenly: Inadequate coverage of cement or primer before assembling joints can create leak paths. Ensuring even and thorough coverage helps avoid potential leaks or failures in the system.
2. Common soldering errors
Not cleaning pipes properly: Dirty pipes and fittings prevent proper bonding during soldering, leading to weak joints. Thorough cleaning is essential for long-term reliability. The Oatey Heavy Duty Fitting Brush effectively cleans fittings, ensuring a strong and durable bond. Remove oils and dirt using an abrasive sand cloth.

Overheating the pipe: Applying too much heat can burn out the flux, preventing the solder from filling the fitting correctly. Over time, this can cause the joint to fail. Even if it seems fine immediately after installation, it could still blow apart 20 years from now in a worst-case scenario.
3. Priming mistakes
Confusing cleaner with primer: Some plumbers mistakenly use cleaner in place of primer. While cleaner helps remove dirt, only primer prepares the surface for solvent-welding by softening the material to allow proper fusion.

Letting primer dry before applying cement: Applying primer but waiting too long before using the cement can also cause problems. The cement should be applied while the primer is still wet, specifically within 5 minutes of applying the primer, to ensure maximum bond strength. Waiting too long allows the pipe to return to its original hardness, reducing the effectiveness of the joint.
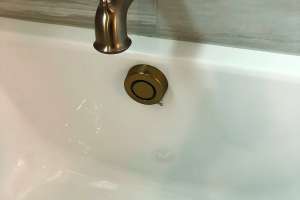
4. Common toilet flange and wax ring installation mistakes
Setting the flange at the wrong height: One common issue is placing the toilet flange flush with the finished floor when it should sit on top of it. Setting the flange at the proper height prevents the need for thicker wax rings and minimizes the risk of leaks.
Improper wax ring installation: Wax rings are essential for creating a watertight seal between the toilet and the drain pipe. Stacking multiple wax rings to fill gaps when the toilet flange is set too low is problematic. The wax rings won’t fuse, leaving potential gaps that allow water leaks or unpleasant sewer gas to escape in the bathroom.
To avoid this, set the flange at the proper height on top of the finished floor. If the flange is too low, instead of stacking wax rings, use a flange extender or stackable spacers, like the Oatey Set-Rite kit, to raise it to the correct level.
Additionally, always place the wax ring on the flange, not on the bottom of the toilet. Setting it directly on the flange ensures a secure seal and prevents the ring from falling off during installation, which can also lead to leaks.
5. Common mistakes when using plumber’s putty
Cold-weather installations: Plumber’s putty can become harder and less effective in colder temperatures. When using Oatey’s Plumbers Putty, wait 15-20 minutes after tightening before giving it an additional turn to ensure proper compression and sealing.

Leaving excess putty under gaskets: Sometimes excess putty is found under gaskets, particularly with basket strainers. This can create a false sense of tightness, leading to leaks once vibrations from regular use cause the connection to loosen. Removing excess putty ensures a solid, long-lasting seal.
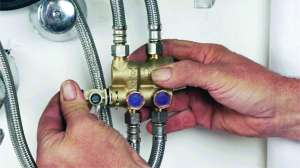
6. Using the wrong tools
Using tools not designed for the job can lead to damage or improper installation. For example, a basin wrench is essential for working behind sinks where space is tight, while a spud wrench (without teeth) should be used for installing high-end fixtures to avoid scratching or damaging delicate finishes.
Trying to make do with the wrong tool, like using channel locks with a rag to protect a finish, often results in visible damage — and an unhappy client.
By making these adjustments, you not only prevent costly repairs and customer dissatisfaction, but you also enhance your reputation as a skilled and reliable professional. Getting it right the first time ensures the best results and long-term success in every project.
About the Author
Sean Comerford is a technical applications manager at Oatey. He is a third-generation tradesman with nearly 20 years of plumbing experience, including serving as the lead plumber for commercial/residential new-construction, service and fire protection jobs.
Continue reading for free