Toilet flange failures might not make front-page news, but online they’re one of the most common plumbing headaches.
Reddit’s plumbing threads are full of photos of cracked rings, corroded cast iron, or wobbly toilets, with the same questions popping up again and again: How do I fix this? Can I repair this? Should I replace this?
The truth is, there’s no one-size-fits-all answer. The right solution depends on the material, the condition of the flange and the subfloor, and the accessibility of the pipe below. Here’s how experienced plumbers evaluate the situation and avoid the costly mistakes that lead to leaks, callbacks, or floor damage.
Repair or replace?
The first step after pulling a toilet is a thorough visual inspection. A flange with a broken metal ring or cracked plastic lip might still be salvageable, but only if the damage is confined to the ring itself.
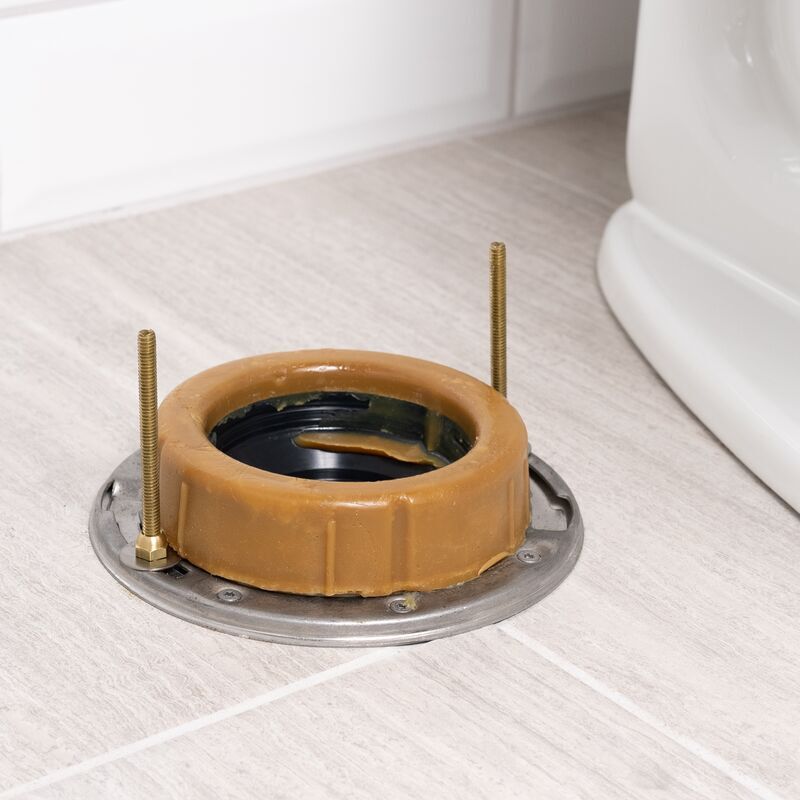
Plastic flanges with cracks in the ring or minor damage, such as minor cracks or wear, can often be repaired using something like an Oatey Fix-it Repair Ring, which anchors into the existing base. A repair ring provides a convenient repair solution that does not require replacing the flange itself. These rings form a secure connection between the floor and toilet.
Similar to a traditional method of installation, the wax ring is mounted on the flange and seals directly to the toilet. This ensures the elimination of leak paths, making the Fix-it Repair Ring ideal for any floor type or flange installation height. Elongated bolt slots prevent bending or bowing, allowing for adjustability after the toilet compresses against the wax ring.
However, if more than half of the flange is broken or the hub (where the flange connects to the pipe) is cracked or deteriorated, replacement is the only long-term solution.
Metal and cast-iron flanges demand closer scrutiny. If corrosion is extensive or the ring can’t hold closet bolts securely, a new flange is usually required. Lead bends, a relic from older installs, are another red flag. They’re prone to loosening and cannot be reliably sealed with modern repair kits. In this case, it’s best to install a new flange.
Follow these tips for installation of a Fix-It Repair Ring.
Remove the broken/corroded sections of the existing ring and clean away any remaining wax from the existing flange.
Dry fit the Fix-It Repair Ring in the desired location to ensure correct alignment and mark anchoring points for reference. Additional holes may need to be drilled into a cast iron flange ring to create alignment with the new repair ring.
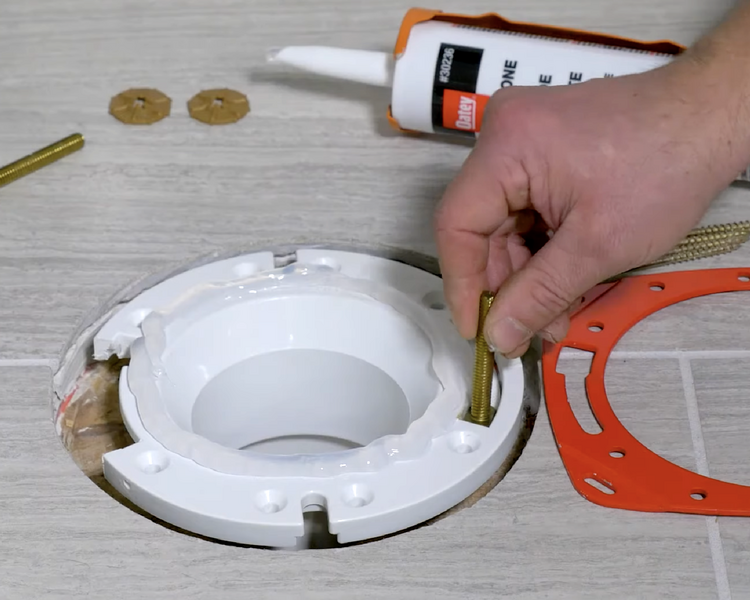
Apply a liberal bead of silicone on the top of the existing flange.
Insert T-bolts into the slots of the existing flange and press the repair ring down into the desired location for correct bolt alignment. Secure it to the subfloor using appropriate screws and anchors.
Do not wipe excess silicone off until the repair ring has been secured to the subfloor.
Evaluate accessibility
Access also plays a major role. If a flange replacement requires cutting into concrete or opening ceilings below, a less invasive repair might make more sense, especially when cost or time is a factor. Sometimes, you do what you can to help a customer get by — as long as you are upfront about the limitations.
In cases like these, repair options such as Oatey Twist-N-Set Replacement Closet Flanges are effective. These flanges seal the interior of the existing pipe without needing excavation. They come with a gasket that expands to fit various types of wastepipes, including service weight, heavy weight, and no hub. Installation is straightforward and requires no tools, providing a smooth and unrestricted flow design.
To install the flange, begin by threading a rubber gasket onto the existing flange until the gasket expands to fit the inside walls of the pipe.
Next, tilt and twist the flange until the gasket starts to grip the pipe.
After that, level the flange and push it flush with the floor, using the closet bolts to tighten it.
Finally, align the flange and secure it to the floor with screws.
Match the solution to the problem
A flange that sits below the finished floor often leads to a poor gasket seal and leaks. The ideal height is on top of the finished floor. For low installations, flange extender kits or spacers can be used to raise the level properly. For example, Oatey Closet Flange Spacers are designed to build up existing closet flanges when new or replacement flooring is installed below grade.
The half-inch spacer is made of durable PVC plastic, and the kit includes two gaskets, toilet bolts, and shims. Each spacer includes four open slots, six screw holes, and two bolt notches for installation flexibility. The spacers can be stacked (up to a maximum of three spacers high) and secured using PVC solvent cement, silicone, or toilet bolts.
The Oatey Set-Rite Spacer Kit includes four individual spacers that eliminate leak paths caused by improper double stacking of wax with spacers. This spacer kit is the only patented and Uniform Plumbing Code (UPC)-listed flange extension product approved for use in repairs and remodels. The four individual spacers can be stacked to any desired height or snapped in half to support an existing closet flange.

“I can pop the spacers in and secure them to the floor, or even to old flanges … It’s a quick repair that homeowners appreciate,” says Mike Mistovich, owner and operator of L&M Plumbing, LLC in Youngstown, Ohio.
Mistovich says flange height issues arise frequently in his area when remodelers raise the bathroom floor. Best practices dictate that the flange be on top of the finished floor. Installing it below a tile floor can lead to drainage issues and leaks, as well as instability for the user. Since toilet flanges secure the toilet to the floor, any compromise can result in rocking and leaks, ruining a newly renovated bathroom.
When a flange sits too high, there’s no shortcut — it must be lowered or replaced.
If the securing ring has broken off but the base is intact, use a Fix-it Repair Ring to re-anchor the closet bolts. Stainless options prevent future corrosion and restore structural integrity without disturbing the pipe connection.
When removing the old flange isn’t practical, a Twist-N-Set Replacement Closet Flange can be seated directly inside the existing pipe. It expands with a rubber gasket to create a watertight seal.
The key is ensuring it sits level. Stacking it over another flange may raise the flange too much and cause rocking or fixture damage.
If you uncover a lead bend or corrosion that prevents secure bolt retention, or if the hub is compromised, replacement is the safest option. While it’s possible to solder and reuse lead, there’s rarely enough material left for a reliable fold or pin joint. Modern PVC or ABS replacements offer a more durable, code-compliant solution.
Mistakes to avoid
Stacking wax rings: It’s tempting to double up wax rings to bridge a height gap, but this is a guaranteed short-term fix. Stacked wax compresses unevenly, leaving voids that can cause potential leaks. Use a thicker wax ring, spacers, or extenders instead.
Ignoring flange alignment: Improperly oriented bolt slots can prevent T-bolts from locking in place, causing loose toilets. The slots should be positioned evenly on each side of the drain opening, parallel to the wall behind the toilet.
Skipping silicone on repairs: When installing repair rings or extenders, seal them with silicone to prevent movement and water intrusion around screw holes. Dry-fit the components first, then apply a continuous bead before securing them.
Working over soft subfloor: A solid substrate is essential. If the OSB or plywood beneath the flange shows rot, reinforce or replace it before reinstallation. Any flange can fail if the floor beneath flexes.
Using the wrong flange type: Inside-fitting flanges can sometimes interfere with the toilet’s horn (the outlet opening on the toilet bowl), preventing it from seating fully. Always measure both the horn diameter and the flange opening to ensure compatibility.
Reusing old wax rings or bolts: Once compressed, a wax ring cannot be reused, even if it is removed minutes after installation. Old bolts should also be replaced because they may be corroded from years of exposure to moisture and bacteria, and the lengths may not match newer toilet bases.
FAQs
Are toilet flange bolts universal? In general, yes. While there are variations in diameters, lengths, and materials (such as brass versus plastic), any combination will fit any flange on the market, including Oatey and others. Preference and specific applications may influence the choice of T-bolts, but most of the time, any T-bolt will work.
Can a toilet flange be located below floor level? No. Your flange should sit on top of the finished floor. If it’s flush or slightly recessed, a flange spacer or thicker wax ring can help ensure a proper seal.
How far should the toilet flange be from the wall? The standard distance for toilet installations is 12 inches from the back wall and 18 inches from any side walls or partitions. However, this can vary, as there are also rough-in measurements for toilets at 10 inches and 14 inches. In ADA-compliant applications, the requirement is to have 18 inches of space from one side wall and a clearance of about 5 feet on the opposite side to ensure wheelchair access. It’s essential to do your homework ahead of time to avoid the need for reworking already installed flanges or pipes.
About the author: Sean Comerford is manager of Inside Sales and Tech Support at Oatey Co. He is a third-generation tradesman with nearly 20 years of plumbing experience, including serving as the lead plumber for commercial/residential new-construction, service and fire protection jobs. He holds a State of Ohio Fire Protection License for Sprinkler and Standpipe.
Continue reading for free